How To Maintain Hardwood Floors: Tips, Tricks, & Best Practices
How To Maintain Hardwood Floors: Tips, Tricks, & Best Practices
I can't tell you how often we hear this particular question asked at Zerorez: "Now that you've restored my wood floor, how do I maintain it from here on?" As we've developed our expertise in this field it still surprises me how little information is out there on how to properly care for wood floors.
Maintaining wood floors and carpet
At first glance carpet and wood floors don't seem to have a whole lot in common. They both are used as floor covering materials but that's about where it ends, right? Well not quite. As far as the maintenance and long-term performance as a floor covering goes they, surprisingly, have a lot in common.
Soil acting as sandpaper
Consider this; the soiling we track into our homes on the bottom of our shoes typically consists of a multitude of substances. The most damaging to both carpet and hardwood flooring are the fine, abrasive, sandy soil particles that we track in. These soil particles are tiny in size and act as abrasive sandpaper beneath the soles of our shoes.
Micro-Abrasion damage
On carpet they'll scratch the fiber surface and over time create, what we in the trade call; "traffic lane gray". It's those areas coming in from the garage or in front of the family room sofa that receive the most traffic and carry the heaviest soil load. Frequent vacuuming helps, however periodic professional cleaning and re-application of carpet protector is what will keep these areas from going off the deep end and force you to replace your carpet before its time.
The same is true for hardwood flooring. The abrasive soil beneath our shoes will, over time, do damage to the top coat that keep your floors protected. We call these micro-abrasions and over time this very tiny scratches dull the finish of your floor.
Three types of wood flooring
Let me give you a quick primer on hardwood floors so you'll better understand what I'm talking about.
There are three types of flooring that fit under the hardwood flooring category: solid wood, engineered, and laminate.
- Solid wood. Solid wood flooring can come in an array of sizes, species, thicknesses and finishes. However, as the name implies it consists of one solid piece of wood from top to bottom. Although these type of floors can be site finished (at your home) these days almost all of them are pre-finished (also called factory finished).
The term pre-finished means that the wood floor boards already have been stained and coated with a protective finish at the factory. More about that protective finish later. - Engineered. This type of floors also comes in a wide array of choices. Typically, this kind of floor is a little less costly then a solid hardwood floor, because they are a lamination of multiple sandwiched layers of plywood with a hardwood top sheet. The top sheet is usually a 1/16" to 1/6" thickness of actual hardwood. Due to its multi-ply structure, engineered wood can be very stable and is less susceptible to shrinking and expanding with changes in temperatures and humidity then a solid hardwood floor. They can be site finished or pre-finished, however as in the case with solid hardwood flooring, site finishing is almost unheard of these days. Because these floors are not solid hardwood, the protective finish is an even more critical issue then for a solid hardwood floor. Some engineered floors have such a thin top layer that sanding is not even an option.
- Laminate. Laminate flooring is a melamine-infused paper on top and a wood chip (or pulp) composite on bottom. Technically speaking laminate is not an actual wood floor. It's in essence a picture of wood on top of a pressboard plank.
Protective finishes that protect your floor
Now let's get back to that protective finish. Imagine leaving a piece of wood exposed to the elements. Over time the UV from the sun and the ambient moisture in the air will make it oxidize and turn the wood a shade of grey.
The same is true for your hardwood flooring. The wood needs to be shielded from the destructive forces of you living on top of it. That's why they are coated with a protective finish. In the old days these finishes would consist of waxes or varnishes and would be very maintenance intensive.
The most common hardwood finishes: Polyurethane and Aluminum Oxide
These days the coatings can be UV cured polyurethanes, aluminum oxide urethanes or a combination thereof. In the last couple of years, a new category has emerged; hard wax oil finishes.
These are very durable protective finishes that keep your hardwood floors shielded and protected from the elements and the daily abuse we subject our flooring too. They are a lot more maintenance friendly then the finishes of yesteryear, however they are by no means maintenance free.
Damage to your hardwood floor
Do you remember the scratchy and abrasive soils on the bottom of your shoes that we talked about at the beginning of this article? Over time these soils will do damage to your hardwood floors protective topcoat finish. Although sweeping, vacuuming and swiffering will help to get most of the surface soil off the floor, the deeply embedded dirt continues to do damage to the finish.
Is your floor trying to tell you something?
Think of tiny pieces of sand that act like sandpaper to your floors finish. They continue to scratch and abrade your floors finish to the point where it will start looking dull in the high-traffic areas. We call this type of damage, micro-abrasive wear. The good news is that like the brakes on your car that start to make noise to give you ample time to get them fixed, this abrasive wear and resulting dullness to your floors finish, is your sign that something needs to get done before the wear becomes any worse.
Your floor does not pop anymore
Most people realize they have a problem when they notice that their floor just doesn't seem to "pop" like it used to after they sweep and clean it. From my experience in dealing with a lot of clients, that point seems to be reached around the 2-year mark.
Store bought products that sound too good to be true
That epiphany often will lead them wood floor owners straight to the floor cleaning aisle at their local hardware store. Many bottles of products will greet you there with some very seductive promises; "restore the shine and luster to your floor", "will look like new again", etc. Not knowing any better you take a bottle home and follow the directions to a "t". And indeed, the first couple of times you apply it to your wood floor, it does look shinier and the "pop" seems to be back.
Your floor is in trouble, and you caused it
But after a couple more applications you start to see some cloudiness in the finish and some streaks and lines appear. The product that sounded like it was the answer to your wood floor maintenance challenges has unfortunately come back to haunt you. You see, these after-market products are typically an acrylic wax that is much softer then the top coat that was applied in the factory to your wood floor.
Layers of quick-shine, orange-glo, rejuvenate or mop & glo
When several layers of wax are applied on top of each other they will start to look cloudy. The silver lining here is that although these types of products create additional challenges, they have provided a degree of protection to your wood floor. Now, however you face a new problem: how do I get rid of the product that is making my wood floor look worse then ever?
How am I going to fix the mess I created?
Unfortunately, there is no easy answer to this question. Because the process to fix this kind of situation involves dissolving the wax buildup on your floor and then removing it by rinsing it off your floor, I highly recommend getting a professional involved who knows what he or she is doing. At Zerorez we've seen this exact scenario numerous times. Believe me when I tell you you're not the only one who's fallen into this trap, and cleaning hardwood floors is a specialty of ours.. Here is a video from a wood floor cleaning in Orange, CA.
Now the question becomes what we originally started with: "Now that you've restored it, how do I maintain hardwood floors from here on?"
The key elements to maintaining your wood floor are very simple.
- Dry soil removal first, followed by
- Damp cleaning with microfiber pads.
- Deep-soil removal
The dry soil removal is ideally done by a canister or backpack vacuum with a hose and a brush nozzle. This will prevent possible damage from the brush roll of an upright vacuum spinning on top of your wood floor. It also allows for better soil removal from edges and crevices. Dry soil removal is a critical step to the long-term wellbeing of your wood floor. It should be performed as often as daily in your high traffic areas coming in from the outside. You may be able to lessen that frequency somewhat by strategically positioning walk-off and door mats to catch soil before it enters your home.
Damp and deep soil removal
Immediately following your dry vacuuming you should be ready to do a damp clean-up by using a cleaning product for wood floors and a microfiber pad. There are many set-ups available and stores such as Target, Walmart or your local hardware store can point you in the right direction. We can even provide you with a professional-grade set-up.
One tip here I can give you is to go light on the cleaning product and stock-up on extra microfiber cleaning pads. You want to exchange these frequently during your damp cleaning. Obviously the frequency of the tasks I'm suggesting here is custom for each household and should be adjusted accordingly.
Depending on your skill level and dedication to step 1 and step 2 you may never have to get to step 3. However, if recent history is any indication at some point you'll arrive at the conclusion that your own cleaning efforts are not seeming to have the desired effect anymore.
Deep cleaning not for the faint at hart
Usually it's a case of the sandpaper effect of fine soil that has dulled your floors finish and some cleaning residue that has built-up over time and now is leaving your flooring looking dull and tired. Although deep-soil removal could be a DYI project for the very ambitious (message me if you want me to walk you through the required steps) my recommendation is to call in a professional to do this for you.
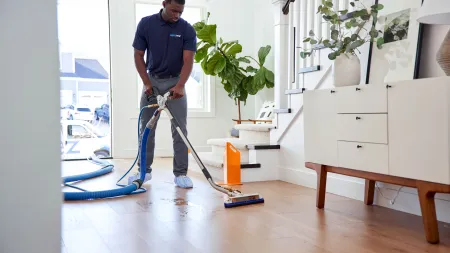
What hardwood floor deep cleaning accomplishes
As you've been maintaining your wood floor there is a high likelihood of your cleaning product leaving a slight residue every time you clean. Over time this becomes a build-up that dulls your floor and is difficult to remove. That's where we as professionals come in. We'll precondition your floor and provide a squeegee deep cleaning and rinse to get all gunk and build-up off your floor.
Final step is a buff for deep shine
Once your wood floor is back to its original state, a white pad or Tampico brush buff will give it a deep and lasting shine and glow. And although this deep cleaning and finish buffing is theoretically something you can do yourself, it's not for the faint of heart.
Professional help and advice
Having trouble with the proper steps to maintain hardwood floors? Why not let the pros at Zerorez® SoCal give your floor some TLC. Give us a call at 949-387-2222 or 866-937-6539. You can also e-mail Eric at ebollmann@zeorezsocal.com.
